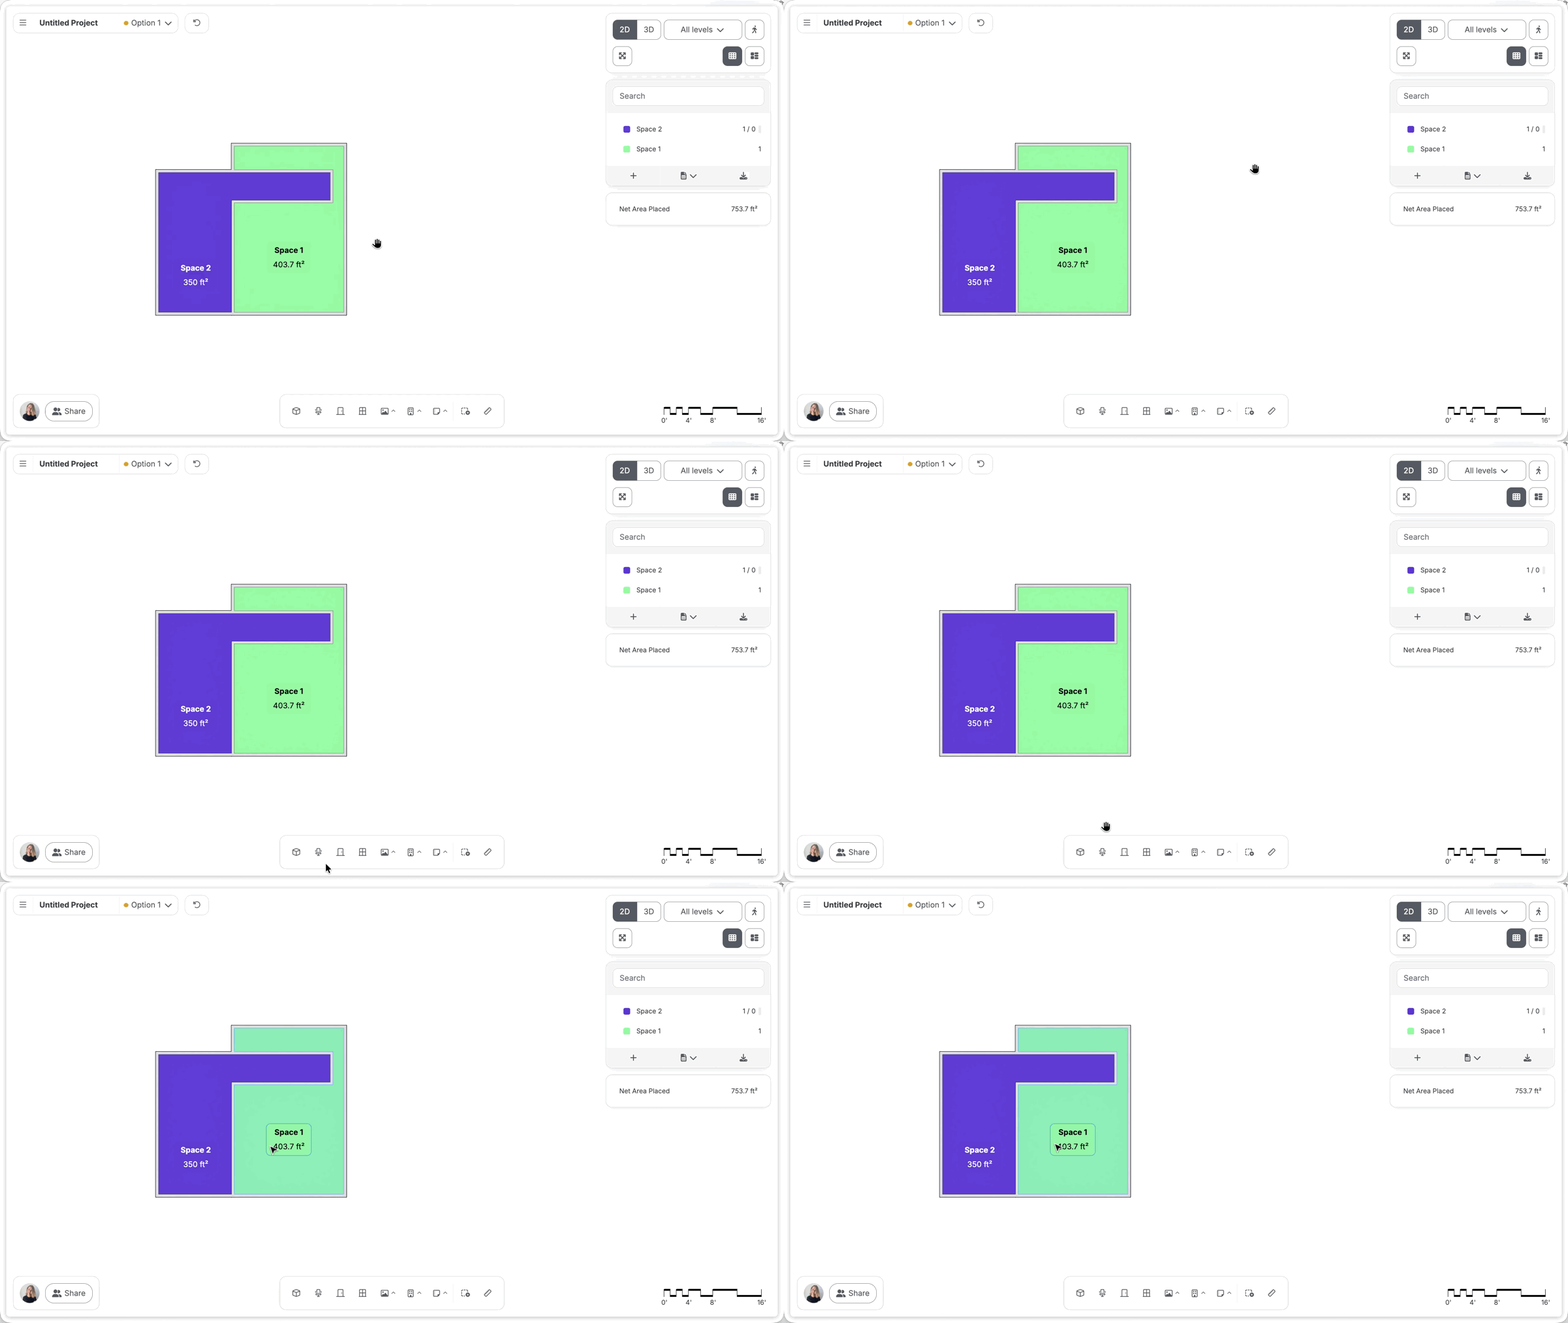
Hypar makes it easy to plan out your building quickly and accurately using elements found in the bottom toolbar.
Spaces
Spaces are Hypar’s core planning element. They can represent a room, area, department, etc. You can change a space’s name, color, shape, walls and requirement properties (like required count and target areas). Spaces snap together letting you quickly create a plan.
Drawing and Editing
Draw or place: place a space at its default size and shape via the bottom toolbar or program panel.
Edit shape: you can simply drag the edges of a space to change a spaces’s width and depth.
Use Constrain Area to keep a space's area fixed while you reshape it.
To edit a space’s shape, select a space and choose Edit Shape in its capsule menu (or double click on the space) to modify its boundary. You can add or delete points to make any shape you need. Hypar does not yet allow for curved spaces.
Copy dot: click a selected element's copy dot to duplicate it, or drag the arrow in the copy dot to create an array of evenly spaced copies, great for desk runs and repeated rooms. You can use the copy dot to copy over a space or set of spaces. Use drag to extend to copy a pattern of spaces.
Space Type: if you need to change a space (ie. from “open office” to a “meeting room”), simply change its type via its space type capsule menu. You can even type in a new type on the fly.
Space labels show the space name and areas. If a space has a required, target area, this will show up in the label.
💡
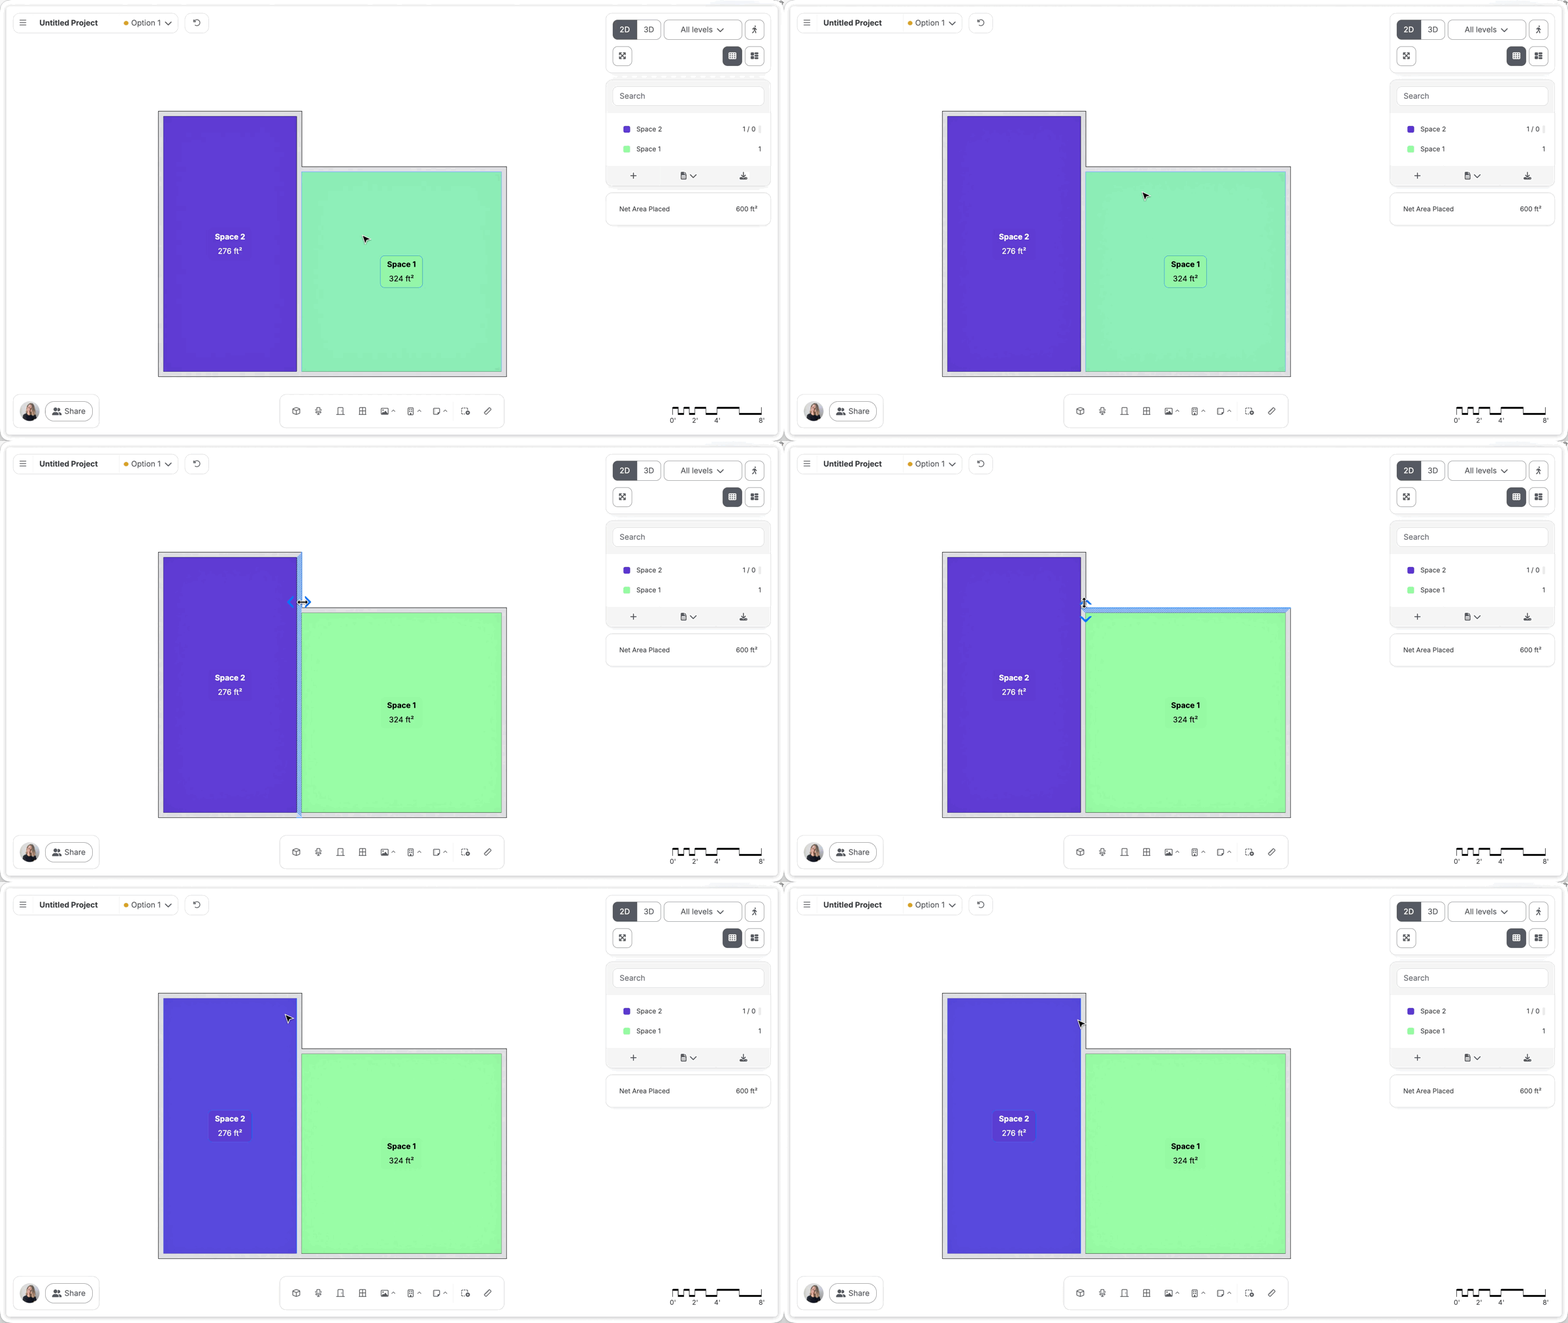
Tip: Hypar is smart about edge dragging when spaces are snapped together. You can create intricate shapes by simply dragging a wall. 👇🏼
Walls
Spaces come with default 5 1/4” or 135mm thick walls.
To remove or add walls for a space, click walls in a space’s capsule menu. You can also edit a space’s wall segment individually by clicking on the wall itself. Drag or type to change wall thickness. To create more segments, double click a space or click edit shape to add more points.
There’s currently no way to draw a single wall that’s not tied to a space in Hypar.
💡
Tip: Once a new wall thickness is set, any new space that’s created from the program panel or bottom toolbar will have this new thickness as its default.
Buildings and sites
Building defines a floor plate that contains your spaces. You can make multiple buildings in a project and have multiple levels in a building.
Site defines the site boundary around your building(s).
Circulation
Draw corridor paths with the Circulation tool (in the Building group). Circulation area is tracked separately in metrics, and Hypar can also generate circulation automatically via AI features.
Min Width sets the corridor's minimum width. Where the realized corridor is wider (for example, where it meets spaces), a faint dashed line shows the set width. Drag the edge or type a value to change it.
Select a corridor to see the area of its whole connected section, editable dimension strings, and rotation. Open corridor ends have a stretch handle for extending the path.
Structure and cores
Column and Grid line for structure; Planning grid for a repeatable layout module. Adjust the planning grid's snapping and spacing to match an existing structural grid (e.g., from your underlay), then keep it as a planning aid or convert it into real grid lines which you can then move individually.
Place one column at a grid intersection and Hypar suggests adding the same column at every intersection. Accept, then delete the ones you don't want. Move a grid line and its columns tag along.
You can change your columns dimensions and shape, including making circular columns.
You can add Stair, Elevator, and Shaft elements for vertical circulation and cores. Note: these are simple placeholder spaces at the moment. They are useful because they are spaces that do not count towards your net areas.
You can also ask Chat to add a stair, elevator, or shaft at a point on a corridor. If the core doesn't fit exactly where you pointed, Hypar looks a short distance along the same corridor for a spot that works and tells you it moved it.
Doors and windows
Place Door and Window elements onto space boundaries/walls. Doors snap to walls, and if you stretch or move the space, its doors tag along. Change a door's size and type from its capsule menu.
Door types: single swing, double swing, opening (no door), single and double-door double-action, sliding and double egress. Change type from the capsule menu. Use the mirror tool on the capsule to flip the swing.
Size: set width and height in the capsule menu (e.g., a 42" × 84" door). Doors automatically adapt to your wall thickness, and copy/paste or the copy dot duplicates them.
Between two spaces, a door stays attached to one of your spaces and stays connected even if you adjust the wall thickness between the spaces.
Precise placement: click a door and zoom in to reveal dynamic dimension strings, from the inside wall face to the outside of the standard 2" door jamb.
Conflicts: if a door swing overlaps furniture, equipment, a clearance, or a column, the door and swing turn bright red. It works whichever thing you move, so sliding a chair into the swing flags the conflict just like moving the door onto the chair does. Click the swing, then the burst icon → Accept conflict to override.
In other modes: diagram mode shows doors as a two-way arrow; walkthrough shows them open. Exported to Revit, doors arrive as the Hypar door family making it easy to swap with your standards.
Windows have editable Width, Height, and Sill Height, and new windows remember your last-used sizes, so placing a run of matching windows is fast.
Levels
Use the level dropdown at the top right of Hypar to switch levels, view all levels, and edit levels (add, remove, adjust and edit heights).
Elements you place land on the active level in 2D. In 3D, they land on the first level but can be dragged up or down.
Move a space between levels: grab the vertical move handle at the bottom center of the space and drag up or down or pick a level from the capsule menu (choosing Upper level / Lower level creates a new level and moves the space to it).
Copy instead of move: hold Alt (Option on Mac) while moving a space vertically.
Span multiple levels (e.g., an atrium): select the space's top edge and stretch it upward.
Edit levels view: switch to 2D and choose Edit levels in the dropdown, use any space's capsule level dropdown, or, in orthographic mode, just tilt the camera into the elevation view. Type new floor-to-floor heights (shifts all levels above) or new elevations (leaves other elevations unchanged).
💡
Tip: You don’t need to explicitly create a level. Levels are automatically created when you move a space up or down.
Precision editing
Nudge with arrow keys (Shift = bigger step); press Space to rotate a selection.
Dimensions: you can use the blue editable dimension strings to precisely place your elements in Hypar. Zooming in also reveals more dimensions, like interior wall-to-door-jamb, when you need a precise value. To dimension a whole level at once, ask Chat to dimension the plan (see Use AI features).
Use Align Selected and Mirror Selected in an element’s capsule menu to align multiple elements or flip elements.
Snapping
As you draw and place, Hypar snaps to endpoints, midpoints, intersections, grid, angles, and basepoints. Hold Shift to constrain drawing orthogonally.
Snapping is zoom-dependent: if you're trying to catch a specific snap (say, a wall midpoint instead of its inner or outer edge), zoom in or out until it locks onto what you need.
Measure
The Measure tool reports lengths as you click. Choose Save dimensions to project to keep what you measured as dimension annotations, or Done measuring to discard.
Lines and arrows
Draw callouts, flows, and pointers with the Line and Arrow tools in the Annotations group of the bottom toolbar. Both draw the same element. The arrow just comes in with an arrowhead on its far end.
Draw. Click each point, then click the last point again or hit the check button to finish. Hold Shift to stay orthogonal.
Edit shape. Select it and choose Edit Shape in its capsule menu to drag points, or click an edge to add one.
Style.Line style in the capsule menu sets the stroke (Solid, Dashed, Dotted) and each end separately: None, Arrow, Circle, or Line Arrow. Thickness and color are there too.
Last-used styles stick. A new line or arrow picks up the color, thickness, stroke, and caps you used last, remembered separately for lines and arrows.
Hide them. Lines and arrows have their own Lines & Arrows group in the visibility settings.
Clearances and conflicts ( 💎 paid feature)
Add a Clearance to furniture, equipment, doors or spaces to reserve the open area it needs and see violations live as you design.
Add a clearance
On furniture or equipment: select it, then click Add Clearance in the capsule menu. The clearance appears with a temporary striped pattern. Stretch it manually, or use the dimension strings overall, or from the side of the object to set an exact size (e.g., 3 ft around a bed).
On a space: select the space, then Add Clearance in the space’s capsule menu. You get a default 5 ft / 2 m turning circle (depending on your units). Toggle it to a rectangle (and back) with Make rectangular / Make round, or edit the shape to suit.
Multiple clearances on one object: just copy/paste or duplicate a clearance.
Edit the shape
Double-click the clearance (or click Edit Shape in its capsule menu) to add, move, or delete points and drag edges. Use the radius handles to round corners by eye, or click a handle and type an exact corner radius. To switch the whole clearance between a circle and a rectangle in one click, use Make round / Make rectangular, the same toggle columns use.
Live conflicts
Clearances stay attached to their host: move or duplicate the furniture and the clearance comes along.
When a clearance overlaps another clearance, a wall, furniture, or a column, it turns bright red with diagonal stripes, so the warning stays visible even over a red space.
When an overlap is intentional, click the clearance, then the burst icon to accept the conflict. Click the check mark to unaccept. If the overlap changes, or you move an accepted item within the clearance, Hypar flags it again for re-acceptance.
Doors participate too: a blocked door swing turns the door and swing red, with the same accept/unaccept flow.
💡
Tips
Clearances snap together, which makes them handy for defining repeatable boundaries like workstation layout modules.
Clearances are native to Hypar: they don't import from or export to Revit (yet).
Last verified against Hypar v0.2.045 — October 8, 2026.